The Royal
Air Force
Prior to 1937 it was it was believed that the role of bomber aircraft was a war-winning strategy and that as defence was futile the need for fighter aircraft was minimal. This situation continued until Sir Thomas Inskip became Minister for Co-ordinated Defence. He reasoned that defence against German bombers was possible if the new metal-skinned monoplanes were used in combination with the recently developed Radio Direction Finding equipment, later to be known as radar. The overall cost, he stated, would be less than that of the continued enlargement of a strategic bombing force. This change in policy, inspired for economic rather than military reasons, was promulgated by the government to the furious objections of Air Marshal. Lord Trenchard who stated that ".....it might well cost us the war." Hugh Dowding, the senior member of the Air Council and known as "Stuffy" by his contemporaries, was diverted from the high profile role of Chief of Air Staff to that of a lesser appointment as head of Fighter Command on its formation in 1936, a sideways promotion. Dowding saw the role of his new command as the defence of Britain and no more. Quite simply he considered the number of fighter squadrons at his disposal was not enough. Despite many plans since the 1920s, the political climate had left all branches of the Armed Forces seriously deficient of even the most basic equipment. This view brought him many powerful enemies when he was later to veto the deployment of more squadrons to the defence of France or to the protection of Channel convoys, which, in his opinion, were flag waving exercises as coal could be transpoted more efficiently by rail. Later, his refusal to settle the "Big Wing" controversy and the poor record of night-fighter interceptions was to lead to his dismissal after the battle, despite having carefully planned and won it. Dowding was not a popular figure among the Air Staff. His shy and awkward approach and lack of interest in the political intrigues was seen as arrogance. Only Keith Park, his former Chief of Staff liked and respected this aloof and lonely man. Park, later appointed as Commander of 11 Group, was later to win the air battle by his cool and reasoned use of the 30 squadrons within his command. At the conclusion of the battle Park too was summarily dismissed without recognition. By
July 1 1940, the outset of the battle, Dowding had 51 operational squadrons
with a further six in the final stages of working up. This number steadily
increased throughout the battle but in numbers of aircraft alone was
never able to match numbers of Luftwaffe aircraft.
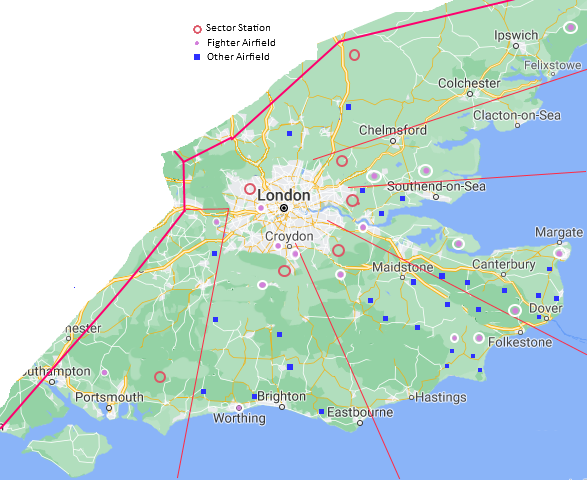
The Fighter Command Groups 9 to 14 were formed on 1st April 1918 but had been disbanded in 1919. They were reformed at intervals in proportion the the estmated threat levels in their areas of responsibility. 9 Group: Reformed on the 9 August 1940 to defend the North West and Northern Ireland. 10 Group: Reformed on the 1st June 1940 to defend South West England. 11 Group: Reformed on the 14th July 1936 to defend South East England 12 Group: Reformed on the 12th April 1937 to defend the midlands and Northern Britain. 13 Group: Reformed on the 15th March 1939 to defend Northern England and Scotland. 14 Group: Reformed on the 22nd June 1940 to defend Scotland. Each Group was divided into Sectors with a controlling Sector Airfield managing the activities of the satelite airfields in the Sector. Given the immediate threat of invasion It was accurately calculated that 11 Group in the south east, Commanded by AVM Keith Park, was going to take the brunt of the battle. There was however, a weakness. When the Luftwaffe shifted targets from channel convoys to airfields in August 1940, there was a risk that bombers breaking through the defensive fighter screen could destroy the undefended 11 Group airfields and sector stations. To counter this, elements of 12 Group to the north were brought to readiness to patrol airfields vacated by 11 Group and carry out "mopping-up" operations behind the main battle area. A tactic that failed on more than one occasion due to a strong and acrimonious difference of opinion between the two respective Group Commanders. The argument centered around what came to be known as the Big Wing based at Duxford. To this day the arguments on the merits of this tactic continue. The groups outside the main battle area were all fully engaged in repelling the Luftwaffe but additionally provided vital functions in the rotation and regrouping of exhausted squadrons from the south and the training of new squadrons to operational status,
RDF Radio Direction Finding: Chain Home and The Dowding System.
As incoming enemy aircraft were located and identified, individual Chain Home stations telephoned their reports to Fighter Command HQ where they were collated and cross referenced with Observer Corps reports. These continued to track the enemy after it had crossed the coast where the seaward facing Chain Home was blind. Contacts were plotted together with approximate numbers, direction, and to a certain extent, altitude. The information was passed on to Group and Sector Operations Rooms for action. Operations Rooms had "Tote Boards" which indicated the immediate status of readiness for each squadron within the Group. It was in this way that fighters could be scrambled and vectored onto the incoming enemy aircraft in proportion to the strength of the attack and the estimated likely target. Without the Chain Home system Sector stations would have been blind. The only option would have been for constant vigilence by standing patrols which, when enemy aircraft were reported, might be many miles away and at the wrong altitude to intercept. Also the patrols would be unaware of the size of the opposing force. In addition to intelligence received form the Chain Home system and reports from the Observer Corps, Ultra and telephone intercepts (Y Service) from Bletchley Park could be fed in to complete the picture.
The Dowding System Radio Direction Finding was not a new idea, Germany had developed Knickbein and X-gerät to guide bombers to their target along a radio beam. They also had a highly sophisticated system to direct anti-aircraft guns, but the method of coupling the radar plots to an interception system and thereafter directing the fighters was unique. Had the Luftwaffe realised the vital importance of this system and it's total reliance on the telephone network they could have directed their attacks on the radar stations, and the sector airfields. In particular, telephone exchanges which were the pivot on which the whole system depended, not only for Chain Home but also reports from the Observer Corps.Had this been the case the outcome of the battle would have been very different. At the outset of the battle Channel convoys were systematically attacked. Later, from late July and early August airfields became the selected targets together with port facilities and industrial targets. The increasingly frequent raids on airfields became more than Fighter Command could deal with and it was inevitable that many were bombed and put out of action for periods of time. Most serious was when Sector Stations like Biggin Hill were hit as this jeopardised the whole interception system. Often, fighters returning home exhausted and low on fuel and ammunition, were diverted to secondary fields at short notice, their own stations being either under attack or unusable. Both sides were claiming inflated scores. On paper at least, the Luftwaffe believed that the RAF no longer had much to offer. Despite this, Luftwaffe bombers and fighters were taking heavy losses due in part to a muddled approach on how best to defend the bomber stream. Fighters had a very limited range over Britain and matching their pace to the slower bombers was wasting much needed fuel. In addition, it was limiting their ability to respond to RAF attacks as they had lost the advantages of altitude and speed. However, Göring insisted on more and more fighters being used for close escort as the bombers were taking unacceptable losses. It became a vicious circle and a second approach was made to arm at least some of the fighters with bombs. This shortened their range yet further causing them to lose their inherent advantages of speed, manoeuvrability and time over target. Nevertheless, attacks on communications centres from this form of attack were highly effective. By 15 September the Battle of Britain was effectively over. The weather was deteriorating and the tides were no longer favourable. Changing the targets away from fighter stations to industrial and civilian targets gave Fighter Command time to recover and regroup. Thanks to Lord Beaverbrook there was no shortage of aircraft but there were almost no pilot reserves and many of the 11 group airfields were in urgent need of repair if they were to remain operational. The respite changed all of this and within two months the RAF was beginning to harass the Luftwaffe over Occupied Europe. This does not mean that the attacks stopped, intruder raids continued, but the huge fleets of bombers heading for the airfields in daylight became smaller and less frequent and instead were diverted to the cities at night. British cities were now the designated target and as a war-winning strategy, this too failed, despite the massive damage. In terms of attrition the losses were nowhere near as great as had been claimed by either side but the objective of air superiority had failed comprehensively. Without this prerequisite there was no hope of an invasion succeeding and by October 1940 the build up of men and materiél across the channel was abandoned as attention was now being redirected eastwards, towards Russia.
The Big Wing: Fighter Command's strategy was dictated by Luftwaffe initiatives. As enemy aircraft were detected by the chain home system and Observer Corps, 11 Group squadrons were sent to intercept in proportion to the size of the raid. That the vast majority of these squadrons were in the 11 Group area was in proportion to the Luftwaffe's deployments in France, Belgium and, to a lesser extent, Holland. Aircraft deployed with Lufflotte 5 in Norway were primarily a risk to North Sea convoys, Scotland and northern England. These played a lesser role during the battle and were ably dealt with by the Fighter Command groups to the North. In response to the detection of an enemy force, 11 Group fighters would be vectored to intercept, necessarily leaving their own airfields exposed. This eventuality had been forseen by Dowding and one of the three roles of 12 Group to the north was to patrol south to protect these aerodromes. This was of vital importance by mid-August when these airfields were the primary targets of the Luftwaffe. The secondary and tertiary roles of 12 Group were to protect the midlands from attack if a raid was mounted from due east and to provide a strategic reserve for 11 Group if required by the 11 Group commander. However, the two respective AOCs of 11and 12 Groups, Keith Park and Trafford Leigh Mallory had scant respect for each other. A situation which, with hindsight, should have been nipped in the bud by Dowding. It was to be one of the causes of his later downfall. Frustration among 12 Group in what they saw as a minor support role gave birth to an alternative tactic. They argued that 11 Group fighters, being closer to the interception point, had insufficient time to reach their desired altitude and often had to turn north, away from the attackers, in order to gain height. Their second point was in what they saw as the piecemeal deployment of intercepting squadrons which could not cause enough damage to stop the raid. They proposed instead that a co-ordinated wing of 12 Group fighters using three to five squadrons should sweep south in concert gaining altitude all the while, to deliver a devastating attack on the incoming bomber stream. This proposal received wide support by those in 12 Group who now saw for themselves a more active role in the battle. This was particularly true for Duxford and Fowlmere-based squadrons who's proximity to 11 Group's northern boundary was agonisingly close; three minutes flying time. The chief exponent of the tactic, or at least its spokesman, was Sqn Ldr DRS Bader. Though a respected pilot and commander, he was not a man noted for either his tact or patience. His ideas on the Duxford Wing had the full support of his Group Commander, Trafford Leigh Mallory, who's open criticism of Park's handling of the battle was well known. Neither Dowding nor Park approved, arguing that the cover for the airfields would be missing and that there was no time to assemble large formations of fighters. Bader's adjutant in 242 Sqn was a Member of Parliament. and used his position to approach the Air Minister directly on the frustrations of 12 Group and the solution provided by the Big Wing theory. Churchill was approached privately and, after calling some of their Group Commanders together, (notably not Park), tacitly approved the plan. Thus the original Duxford Wing, comprising 19 Sqn, 310 (Czech) Sqn and 242 Sqn was formed, having been promulgated outside the chain of command and without consulting Dowding. In addition to the unofficial formation of the Duxford Wing which began working up in the 12 Group area, a further problem in 12 Group in the protection of 11 Group airfields. While pilots were allowed some discretion in their actions regarding their actual as opposed to requested altitude from the ground controllers, there was an increasing number of instances when patrolling aircraft either arrived late, having taken too long in forming up, or had flown towards London or the south east coast to harry bomber streams, leaving 11 Group airfields open to attack. On 26 August Debden was attacked in the absence of any fighter cover. In view of this repeated failure Park ordered his northern squadrons not to attack until 12 Group fighters had arrived. An extraordinary situation that should not have been allowed to continue. However, from operations in their own area it appeared that the Wing was showing promising results in terms of enemy aircraft destroyed. This is unsurprising as the number of claims would tend to increase in direct proportion to the number of aircraft involved. With three to five squadrons in concert, (36 to 60 aircraft), the number of claims would naturally escalate. Secondly, the 12 Group area was near the limit of the Bf 109s range, which had only seven minutes flying time before having to turn back. It is now known that actual number of aircraft destroyed is somewhat less than a third of the number claimed at the time. It was not until 7 September that the Duxford Wing operated together to patrol North Weald. This was the day that the Luftwaffe was to make a huge tactical blunder. To date they had concentrated on the airfields with considerable success. Had their intelligence been better, they could have concentrated their attacks on fighter aerodromes but even so, the situation they had created was critical. Indeed, another week of such attacks might well have tipped the balance. However, on this day the target was London and the airfields were to be given a respite, a tactic which would lose Germany the battle . Bader, leading 242 Sqn sighted KG2 heading unescorted over the Thames estuary towards London . 242 Sqn left its patrol area to attack, leaving the rest of the Wing behind. The attack was a failure. The bombers continued on their course to bomb the London docks largely unopposed. Leigh Mallory' s subsequent report on the action blamed the low altitude of his fighters. An interesting comment as the raison d'etre of the Wing's tactic was that it had more time to gain altitude on its flight south. On 15 September, continued heavy attacks by heavily escorted Luftwaffe bombers committed every fighter in 11 Group. Yet 12 Group again left their patrol area to fly south, some beyond London leaving the home airfields, north London and the midlands undefended. Ironically, this substantial force of fighters achieved an unexpected result. German intelligence reports has estimated that the RAF was a spent force. The sudden arrival of the Wing was a total surprise and helped to undermine the morale of the Luftwaffe which by now was taking unsupportable losses. This date also marked a deterioration in the weather and a change in the tides making conditions for an invasion unsuitable. Effectively the Battle of Britain, as a precursor to invasion,was over.
|